To read Part One – Understanding HTML – click here.
You are reading Part Two – Uploading Templates.
Part Three – coming soon.
Of the four parts I’ll be writing on Customizing Blogs for Dummies, this is really the only part you need to read. If you don’t read anything else you can still have a cool blog by only reading this tutorial. I’m going to teach you how to upload a template to a blog and give you tips for what to look for to make customizing your blog easier.
When looking for a template to upload, I would recommend looking past what the entire template looks like. Don’t worry about the colors or the graphics because I’ll teach you how to change those later. Focus your attention on the functionality of the blog.
Here is the original template I chose for my current blog design (August 11, 2008).
I was attracted to this because #1 I liked how the side bar looked. The spacing of the sidebar, size and color of the letters looked good and gave me less to have to customize. #2 I loved the date thing next to the title as well as everything else related to the title. It looks so clean with the author, date and time below the blue line. #3 I loved how there was a very visual break in between posts. My last blog design didn’t and I hated that and never figured out how to fix it. #4 I loved that quote bubble for the comments. #5 I loved the links (home, comments, entries) near the top. I wanted a blog where I could have links back to my company website and wasn’t in the mood to mess with the code and figure that out myself. I did have to rename and redirect those links where I wanted them, but that was easy.
Until you upload a template to blogger (I’ll teach you that soon) you don’t always know what you are getting. The small picture they show you on the template sites doesn’t show everything. I got lucky with this template and actually liked it better when I uploaded it to blogger. I like little things like the way it looks when you link to other sites but I wouldn’t have known without trying it out.
Here are a few templates I think would be fun to customize. These aren’t necessarily my favorites but a few that caught my eye in a quick Google search.
#1 Tic Tac – It’s one of the standard templates you can choose from Blogger in your dashboard. It has these totally cute yellow bullet points that I love. I did try customizing that one but I couldn’t get a customized header to go straight no matter what I tried so I wouldn’t recommend it for you guys. Notice, I’m freely admitting I don’t know it all. I don’t. Not even close.
#2 Diet - I actually did have this on my own blog for a couple days but I was never satisfied with what I came up with so I started with something else. Here is how far I got with the customization. I loved that each post had its own white box. I liked the way the title looked and I liked the way the boxes had the dashes on the side.
#3 The Hobbit – Oooh… I see potential. Notice there is a link to download the template at the top.
#4 Neonix - The first thing I would do is widen this one. I like all the links at the top and love that it is clean and simple.
#5 Top Secret - If someone uses this one will you make sure to show me. It just looks so much fun. I didn’t use it because if you customized it the entire look would change and I wanted to make up my own design.
If you don’t like any of these designs do a goggle search for “blogger template” or something else close to that.
Here is how to use the templates you find.
1. Download the template onto your computer.
2. Unzip the files.
3. Read the “read me” file to make sure you are not going to violate any copyrights.
4. Find the XML document and make a mental note which one that is. Note: It’s my understanding that need to find templates in XML to be able to successfully upload into Blogger. If your template doesn’t have any XML files, I don’t think it will work.
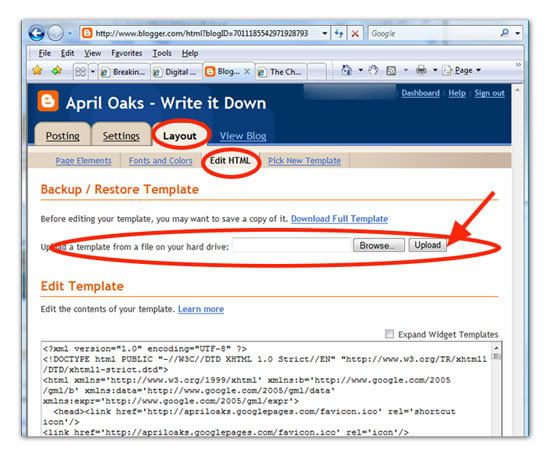
5. Go to your blogger dashboard. http://www.blogger.com/ Click on Layout, then Edit HTML.
6. At the top you can save your current template. I never did but it’s a good idea if you think you’ll ever want it again or in case you mess up.
7. Upload your template. You start this by clicking on the browse button. Look for the XML document, as referenced in step 4, then click upload.
8. You may have to click save template. I can’t remember but you’ll know you did it right because you’ll be able to click a button to preview your new design.
If you like the way your blog is, you are done. If you want to go on to customize your blog even further you’ll want to read part three which I will try to get up in the next few days.
1 comments:
You're so good to post all this. Thanks for the tips!
Post a Comment