My super awesome photographer friend, Ursula, wrote me this:I love your blog!!!!!!!! How did you customize it like that? Change the comment thing? And the picture frames...Add the cool stuff. LOVE IT! I know you are a genius...I just didn't know you were that awesome at HTML too!
Thanks Ursula. You totally made my day. I’m glad I have you fooled. The truth is I barely know what I’m doing. My husband has taught me a little about HTML and that did help get me started. The way I’m going to teach you how to customize your blog truly is for dummies. You won’t learn all you need to know to customize blogs from scratch but you’ll learn just enough to help you customize any template.
Here are the lessons I’ll share with you:
Part 1 – A basic understanding of what HTML code is and how it works.
Part 2 – Choosing a template and uploading it.
Part 3 – Changing your blog banner and adjusting the size of your columns.
Part 4 – Customizing all graphics on your blog.
You don’t need to know everything I write in this post but I think you would be smart to read it anyway. It will give you a better foundation when you start customizing your blog.
HTML is the code many websites are written in.
- You can look at the HTML code of your blog or any website (assuming it’s written in HTML) by clicking View>Source at the top of your screen.
- In Blogger, you can also see the HTML code in your dashboard by clicking on Layout, then edit HTML. If you are viewing your HTML code off your dashboard in Blogger, you will only see the HTML code for your template. You won’t see the HTML code for all of your actual posts which is GREAT because it lets you focus on the part of the code that you need to change your template.
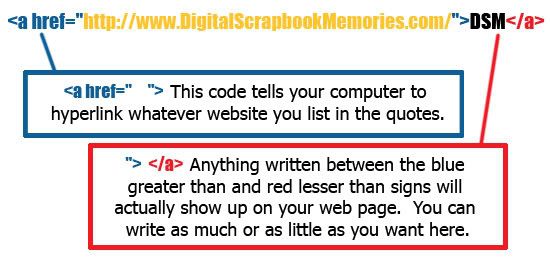
By looking at the code, you can see that not everything written in the code actually shows up on your webpage. You’ll notice a lot of greater than or less than symbols (is that what they are called outside of math?). These symbols frame a command. For example, if I want to add a hyperlink to my website like this…
…I would need to type this into my HTML code…
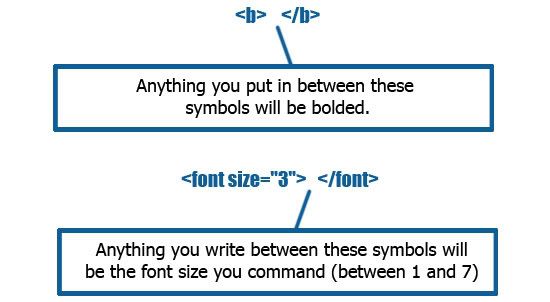
In a minute I want you to go to go to webmonkey.com and read the HTML cheat sheet. While there, notice that there is a backslash at the end of each code. The backslash is what tells your computer that is the end of command.
For example the code to bold your text or change the font size looks like this:
Now go to webmonkey.com and look through the HTML cheat sheet. Don’t worry about memorizing anything; just bookmark the site for future reference. I'll post the other tutorials within the week.


4 comments:
My brother in law also commented on how amazing your blog is. He asked if you work in the field of computers!!
I am completely impressed. And thanks for teaching us how. Now I just need to read carefully through your blog so I can try to learn.
Wow, I am a blog designer, and I've just been working with standard blogger templates, and changing the graphics. My design partner emailed me to look at your blog, and asked, "How does she get the header so cool?" I look forward to reading your tutorials. It looks looks you customized a Wordpress Template to work on Blogger. Is that right?
Haha.. Sarah you beat me to the comment.
April thank you so much for giving us another piece of your world. You are awesome! I look forward to reading the other tutorials.
Yeah! HTML lessons! My DH is redoing my work blog as we speak...well, I am doing the non HTML stuff and I am using wordpress. I will go look at that site. I knew the info about the links as I see it when I copy/paste the code from photobucket but I didn't know that about making things bold and stuff. I look forward to future tutorials!!! Thank you!!!!!
Post a Comment